Creating a custom media wall can really transform your living space. These installations serve as dedicated areas for TVs and electronics, adding both style and function to modern homes. Consider customizing the design to fit your personal taste, whether it’s sleek and contemporary or warm and rustic. Integrating built-in cabinets or floating shelves helps maximize space, keeping everything organized. It’s also essential to think about materials that match your decor while maintaining airflow for your devices. A cozy touch can come from LED lighting or a bold accent wall behind it. With planning and the right professional help, you’ll have an appealing media wall that enhances your home’s value too.
1. What is a Media Wall?
A media wall is a dedicated area in your home that combines technology and style. It serves as a hub for your television, audio/video equipment, and decorative elements, creating an organized space that enhances the overall look of the room. This design solution not only manages your devices but also elevates your living area, making it a focal point for entertainment and relaxation.
Customizable to fit any room size or shape, media walls can reflect your personal style, showcasing your tastes through the choice of materials, colors, and layouts. They allow for the integration of multiple devices, such as sound systems and gaming consoles, all in one place.
By wall-mounting your TV and incorporating shelves or cabinets, you can maximize your space, reduce clutter, and create a clean, modern aesthetic. A well-planned media wall can improve your viewing experience by positioning screens at optimal heights while also providing storage solutions for your media collections. Ultimately, a media wall installation blends functionality with aesthetic value, making it an essential element in today’s modern homes.
2. Key Design Elements for Media Walls
When designing a media wall, customization is key. Tailoring the wall to fit your personal style ensures that it complements the rest of your home. Proper ventilation is essential, as it keeps your electronics cool and functioning smoothly. Including storage solutions like built-in shelves or cabinets helps declutter the area, providing organized spaces for media items.
Consider the layout carefully to optimize viewing angles and accessibility, making it easy for everyone to enjoy their favorite shows or movies. Balance the technology with decorative elements by incorporating spaces for personal items, such as photos or artwork. Choosing colors and finishes that align with the room’s overall design will enhance the aesthetic appeal.
Don’t overlook the importance of adequate lighting; it can highlight features of the media wall and set the mood for your space. Using durable materials ensures that your media wall stands the test of time. Thoughtful wiring and cable management will help maintain a clean, sleek look. Lastly, think about incorporating adjustable shelves or movable components for added flexibility, allowing your media wall to adapt to your changing needs.
3. How to Maximize Your Space
Maximizing your space with a custom media wall involves smart design choices that enhance both functionality and aesthetics. Start by wall-mounting your TV; this not only creates a modern look but also frees up valuable floor space, making your room feel larger and more open. To add style without clutter, consider incorporating floating shelves. These can display books, plants, or decorative items, all while keeping the floor clear.
Built-in cabinets are another great option, as they offer hidden storage solutions for your electronics and other items, helping to maintain a clean and organized look. Make sure to extend these cabinets and shelves up to the ceiling to utilize vertical space efficiently. In smaller areas, opt for slim profiles and minimalistic designs that won’t overwhelm the room.
Multi-functional furniture can also be a game changer. Look for pieces that provide media storage alongside other uses, like ottomans with hidden compartments or coffee tables that double as storage units. Don’t forget about corners; L-shaped media units or corner shelves can maximize every inch of your space.
If your space is extremely limited, consider a pull-down or hidden TV, which can be tucked away when not in use. Plus, using mirrors or light colors around the media wall can create an illusion of more space, giving your room a bright and airy feel. All these elements work together to create a functional and inviting environment.
4. Integrating Aesthetics into Media Walls
When designing your media wall, the choice of materials plays a crucial role in aligning with your home’s style. Opt for wood or metal finishes that resonate with your existing decor. Ambient lighting can also transform the space, creating a warm and inviting atmosphere. You might consider painting an accent wall in a bold color to draw attention to your media wall, making it a vibrant focal point in the room.
Adding textures like wallpaper or natural stone can introduce depth and interest, breaking the monotony of flat surfaces. Integrating art pieces into your design not only personalizes the space but also enhances its uniqueness. Open shelving can be a great way to display decorative items alongside your electronics, blending functionality with aesthetics. Incorporating plants or greenery adds an organic touch, refreshing the overall look.
Framing your TV with built-in cabinetry can elevate its appearance, making it feel like a well-thought-out part of the room rather than just a screen. Achieving symmetry with balanced arrangements of shelves and decor can create a harmonious look. Don’t hesitate to experiment with different layouts before finalizing your design; it’s an essential step to ensure you’re satisfied with the final result.
5. Essential Functional Features
When planning your custom media wall, it’s crucial to prioritize essential functional features that enhance usability and convenience. Start by ensuring you have enough electrical outlets for all your devices. This prevents clutter and keeps your space looking tidy. Incorporate cable management solutions to hide wires and cords, maintaining a clean aesthetic. It’s also wise to design with future technology in mind; including extra sockets and pathways can help accommodate upgrades down the line.
Consider cooling solutions like vents or fans if necessary, especially if your setup includes high-performance equipment that generates heat. If noise is a concern, soundproofing materials can minimize distractions, creating a more enjoyable viewing experience.
Adding remote control access lets you operate devices conveniently, while planning for easy access ensures you can maintain or change out devices when needed. Include shelving for additional tech, such as gaming consoles or DVD players, and think about adjustable mounts for flexibility in screen positioning. Lastly, don’t forget to plan for any additional features like speakers or media players to round out your entertainment setup.
- Ensure you have enough electrical outlets for all devices.
- Incorporate cable management solutions to hide wires and cords.
- Design with future technology in mind to allow for upgrades.
- Include cooling solutions like vents or fans if necessary.
- Consider soundproofing materials if noise is a concern.
- Add remote control access for convenient operation of devices.
- Design for easy access to devices for maintenance or changes.
- Include shelving for additional tech like gaming consoles or DVD players.
- Consider adjustable mounts for flexibility in screen positioning.
- Plan for any additional features like speakers or media players.
6. Creative Media Wall Ideas
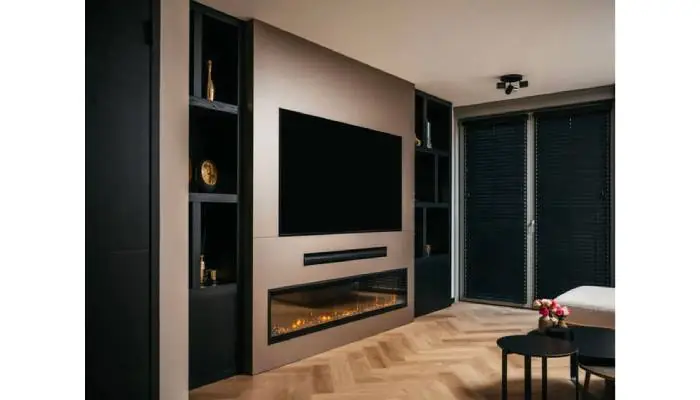
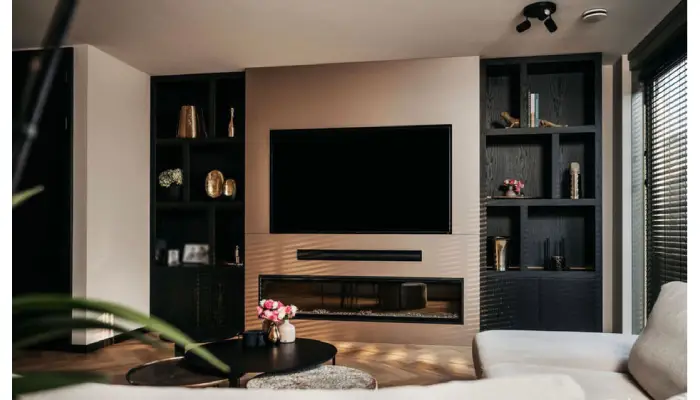
Consider a fireplace media wall to create a warm and inviting focal point in your living room. This setup not only provides a cozy atmosphere but also serves as a stylish backdrop for your television. If you’re looking to add character, a wood feature wall can bring a rustic charm that contrasts beautifully with modern tech. For those who value flexibility, modular units are a great option; they can be easily reconfigured to adapt to changing needs or tastes over time.
Incorporating built-in seating can transform your media wall into a cozy viewing area, perfect for movie nights or gaming sessions. Open shelving is another creative touch, allowing you to display books, art, and personal items that reflect your style while keeping the space organized. For a more artistic approach, consider a gallery wall, framing art around your TV to turn it into an integrated piece of decor.
If you’re short on space or prefer a clean look, a slide-out mechanism for the TV can be a game-changer, letting you hide the TV away when it’s not in use. For gaming enthusiasts, a dedicated gaming zone can be created with specialized storage solutions and decor that fits the theme. Finally, don’t shy away from unique shapes or asymmetrical designs for a modern aesthetic, and think about adding a bar area or mini-fridge nearby to keep drinks handy for entertaining.
7. Budgeting for Your Media Wall
When planning your custom media wall, budgeting is essential to ensure you create a space that meets your vision without breaking the bank. Costs can vary widely based on the materials you choose and the complexity of the design. To start, set a budget range to guide your decisions. For instance, custom media walls typically range from $7,000 to $18,000, so knowing your limits can help you make informed choices.
Don’t forget to include installation costs in your budget as they can be significant. If you’re considering a more straightforward design, think about DIY options to save on labor costs. However, investing in high-quality materials is crucial for durability and longevity, so allocate a portion of your budget for this.
It’s also wise to plan for unexpected expenses by setting aside extra funds. If you decide to hire a designer, factor their fees into your overall budget. To find the best prices on materials, do your research and compare suppliers. If your budget is tight, consider financing options that could help spread out the cost over time.
Lastly, keep in mind the long-term value of your investment. A well-designed media wall not only enhances your living space but can also increase your home’s value down the line.
8. Tips for Successful Installation
Engaging professionals with experience in custom installations is crucial for a successful media wall project. They can guide you through the complexities and ensure that everything is properly executed. Start with a detailed plan that outlines your vision, dimensions, and material choices. Accurate measurements are essential; double-check them before ordering any materials to avoid costly mistakes.
Consider the weight of all components, including your TV and shelving, to ensure adequate support. This is particularly important for wall-mounted installations. Additionally, plan for the location of electrical outlets early on, so you don’t end up with unsightly cords or insufficient power sources.
Communication is key. Clearly convey your needs and vision to the installers to avoid misunderstandings. Also, be prepared for potential time delays; unexpected issues can arise during installation, so it’s wise to allow for some flexibility in your timeline.
Before starting, check local building codes to ensure compliance with regulations. Once your media wall is installed, test all components to ensure they function correctly before finalizing the project. Finally, remain open to making minor adjustments during the installation process; this can help achieve the best final result.
9. Maintaining Your Media Wall
Maintaining your media wall is essential to keep it looking fresh and functioning well. Start by selecting materials that are easy to clean, such as laminate or treated wood, which can withstand regular dusting. Dust surfaces regularly to avoid buildup, using microfiber cloths that won’t scratch finishes. For different materials, always use appropriate cleaning products; for example, glass cleaners for glass surfaces and gentle cleaners for wood finishes.
It’s also important to check your electronics periodically for any signs of trouble, like unusual noises or overheating. Ensure proper ventilation behind the media wall to prevent dust buildup and overheating of devices. If your setup is complex, consider scheduling professional cleaning to address any hard-to-reach areas or specialized equipment.
Organization plays a key role in maintenance, too. Keep cables neatly arranged to prevent tangling and potential damage, using cable management systems or decorative boxes. It’s wise to schedule a yearly maintenance check for your electronics to ensure everything is in good working order. Replace any burnt-out bulbs in lighting fixtures promptly to maintain the ambiance.
Lastly, be mindful of changes in humidity or temperature, as these can affect the materials used in your media wall. Keeping an eye on these factors will help preserve the integrity and look of your installation.
Frequently Asked Questions
1. What is a custom media wall and why should I consider one?
A custom media wall is a built-in structure designed to hold your TV, speakers, and other entertainment gadgets, all while enhancing the look of your living space. It’s a great option for modern homes because it maximizes your space and keeps everything organized.
2. How do I plan the design for my media wall?
Start by measuring the space where you want the media wall. Consider what equipment you want to include, like your TV, sound system, and storage for media. You can sketch out ideas or use design software to visualize how it will look.
3. Can I install a media wall myself, or should I hire a professional?
While some people may choose to install a media wall themselves, hiring a professional is often a good idea. Professionals can ensure the installation is safe, secure, and aesthetically pleasing, especially with wiring and fitting multiple components.
4. What materials are best for building a media wall?
Common materials for media walls include wood, MDF, and plasterboard. Each offers different aesthetics and durability, so consider your home’s style and how much use the wall will get. You may also want to include shelves or cabinets for added storage.
5. How do I make sure my media wall has good cable management?
Good cable management is key for a clean look. Plan for cable channels or conduits in your media wall to hide wires. Many custom installations also include built-in cable management systems to keep everything tidy and concealed.
TL;DR A custom media wall is a stylish and functional solution for modern homes, perfect for organizing tech and enhancing decor. Key design elements include customization, ventilation, and integrated storage. To maximize space, consider wall-mounted TVs and built-in cabinets, while ensuring aesthetic appeal with harmonious materials and lighting. Functional features like sufficient electrical outlets and futureproofing are essential. Budgeting typically ranges and professional installation is recommended. Regular maintenance with user-friendly materials will keep your media wall looking its best.